

How To Change The Configuration Of An Integrated Camera Laptop
How to Prepare Integrated/Built-In Webcam Not Working on Windows 10
Virtually modern laptops take built-in webcams, so they don't crave separate devices. If your integrated laptop webcam stopped working, read this article and discover out how to prepare it.

Webcams facilitate video conferencing, remote piece of work, and social uses with friends and family. They are also useful tools for didactics, including distance learning, etc. For some people, webcams play a large part in their daily lives and, thus, it can be very frustrating when they finish working. This problem is quite common, especially post-obit contempo upgrades from older Windows operating systems to Windows 10.
The leading cause of this trouble is outdated, faulty, or incompatible drivers. In this instance, webcams practise not respond, or associated applications display the error message, "We can't discover or tin't start your photographic camera" (or similar).
Fortunately, you can solve this problem hands. In the guide below, we outline several solutions so that y'all can get your webcam up and running.
Video Showing How to Fix Integrated Webcam Not Working on Windows 10:
Table of Contents:
- Introduction
- Update Your Windows
- Run Windows Troubleshooter
- Re-enable Your Webcam
- Ringlet Dorsum Webcam Drivers
- Update Webcam Drivers
- Reinstall Webcam Drivers
- Turn On Your Webcam Using Function Keys
- Video Showing How to Set Integrated Webcam Non Working on Windows 10
Update Your Windows
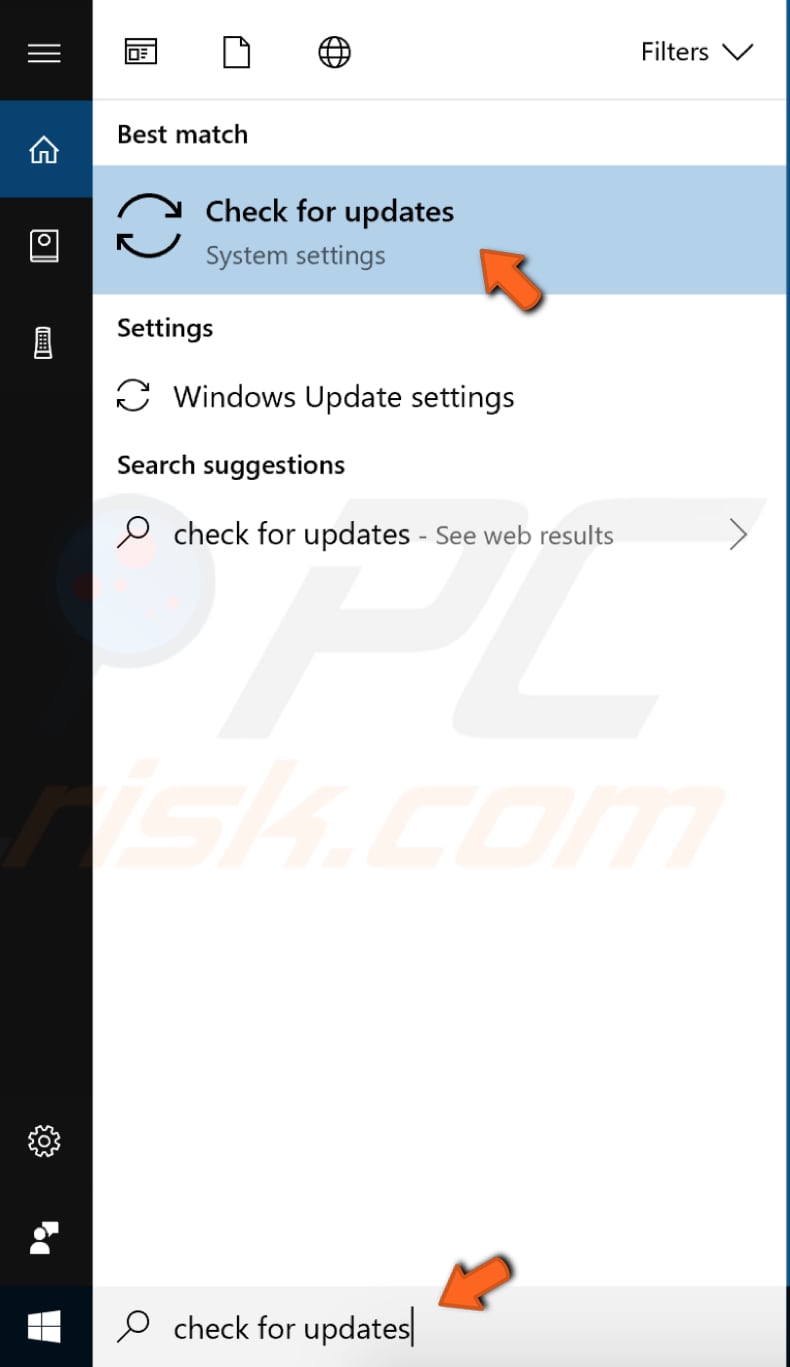
Start, try is to update the current version of Windows. Checking for updates for the entire Windows operating system is commonly a skilful idea and might assist solve the webcam problem. To cheque for Windows Updates, type "cheque for updates" in Search and click the "Check for updates" result.
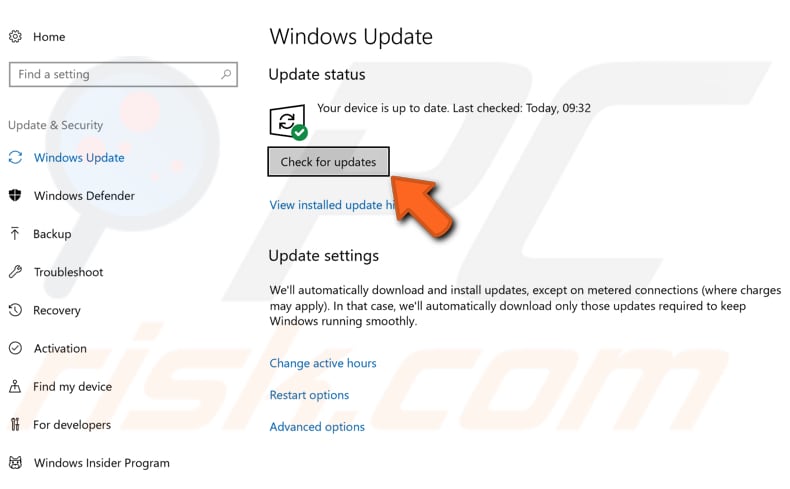
You should exist automatically directed to the Windows Update section. Click "Check for updates". Windows will start checking for updates. If in that location are updates available, install them and check for updates over again (just to ensure that y'all have the latest updates on the operating organization).
After installing updates, come across if you yet have problems opening and using your integrated (born) webcam.
[Back to Table of Contents]
Run Windows Troubleshooter
Windows includes several troubleshooters designed to quickly diagnose and automatically resolve various computer issues.
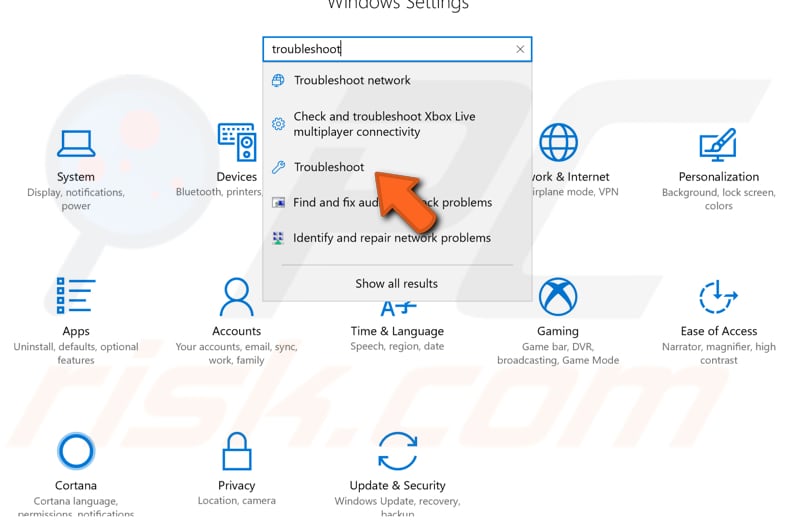
Go to Settings, type "troubleshoot", and select "Troubleshoot" from the list to start troubleshooting.
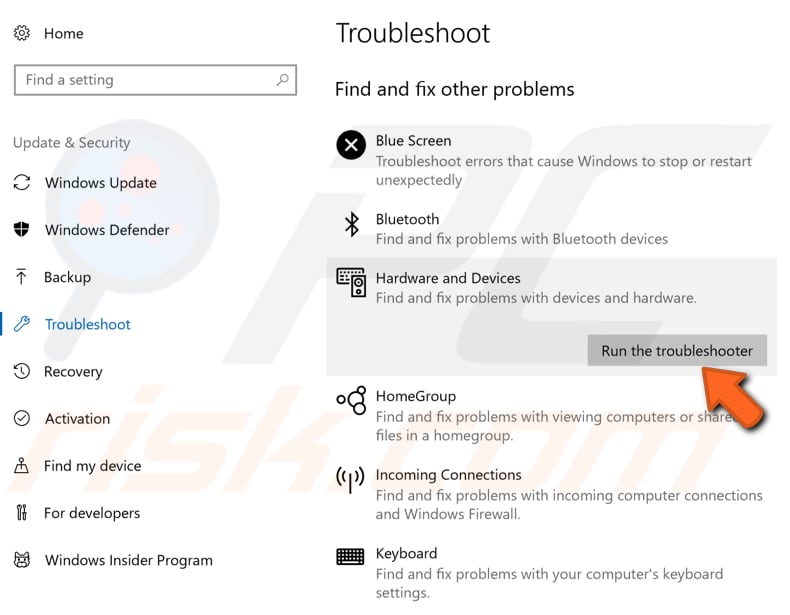
Observe "Hardware and Devices" under "Find and fix other issues", select it and click "Run the troubleshooter". The troubleshooting process will beginning. Follow the instructions and encounter if information technology finds and fixes any problems with the installed devices on the operating system, including the webcam.
[Back to Tabular array of Contents]
Re-enable Your Webcam
Another method that might solve the webcam problem is to disable and and so re-enable information technology. Some users have reported that this simple play a trick on solved the problem. To re-enable the webcam, type "device director" in Search and click the "Device Manager" result.

You will run into a listing of devices connected to your computer. Observe the webcam device under "Cameras", double click the"Cameras" section, and yous will see the webcam device. Right-click it and select "Disable device" from the contextual menu. And so, correct-click information technology once more and select "Enable". Meet if this solves the problem with the webcam.
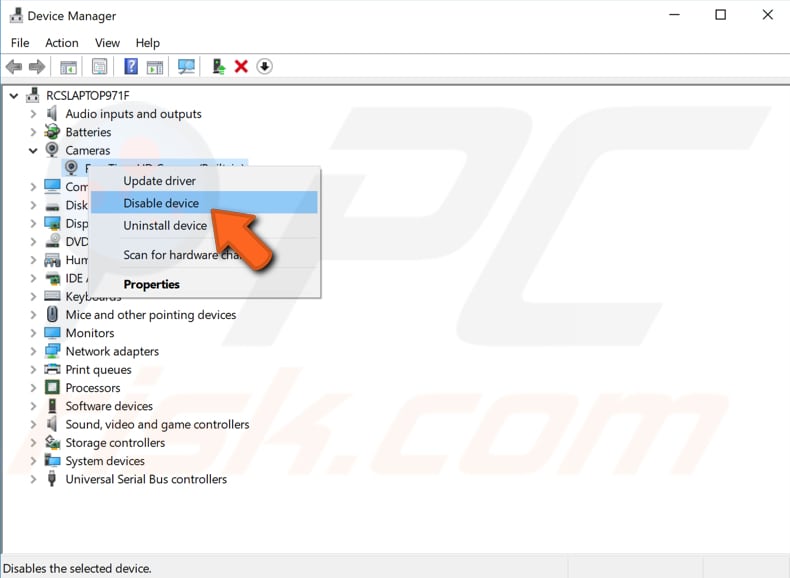
If you cannot detect the webcam device nether Cameras in the Device Manager list, await for the"Imaging devices" or "Audio, video and game controllers" section and aggrandize it by double-clicking on it or clicking the arrow nigh it. Observe "Integrated Photographic camera" or other similar name and re-enable information technology by following the previously-mentioned steps.
[Dorsum to Table of Contents]
Ringlet Back Webcam Drivers
Roll Dorsum Driver is a Windows Device Manager characteristic that is bachelor in all versions of Windows. This feature enables you to uninstall the currently-installed commuter of a hardware device and then install the previous version.
This feature is typically used when newer drivers are not working properly. Note that the latest and updated drivers are usually improve than previous versions and include specific improvements.
Despite this, updated drivers tin actually cause issues rather than set up them. The Curl Back Driver feature enables y'all to simply uninstall the electric current commuter and supercede information technology with the previous version inside a few mouse clicks.
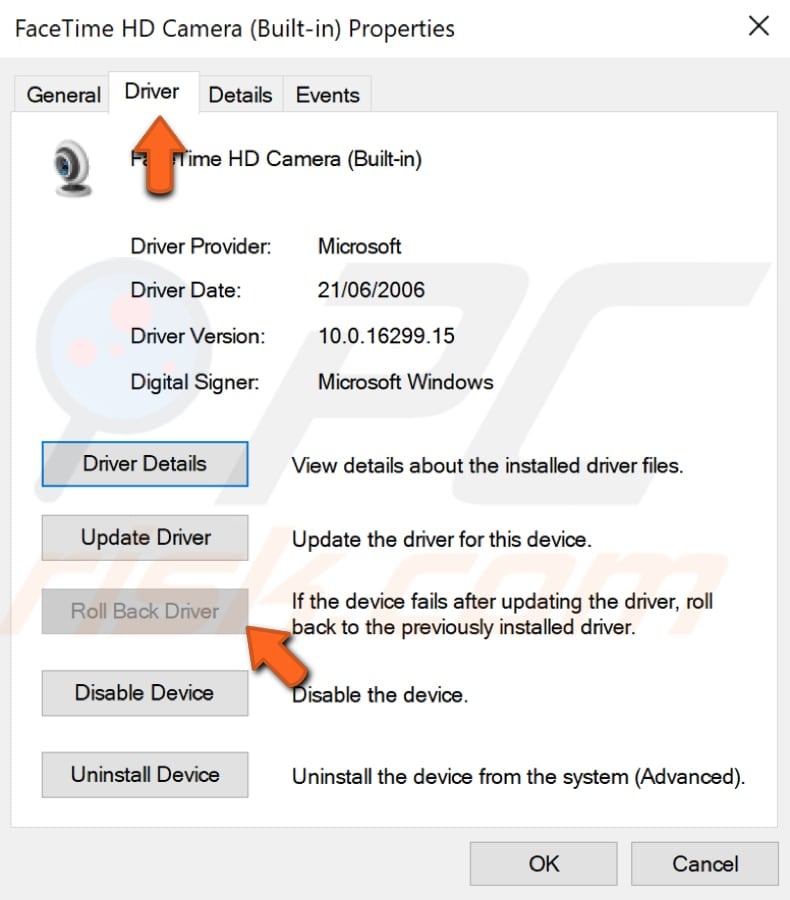
To roll back your integrated (built-in) webcam driver, access Device Manager. Find the webcam device nether the"Cameras", "Imaging devices" or "Sound, video and game controllers" section and right-click it, select "Backdrop" from the contextual menu.

In the webcam properties window, go to the"Driver" tab, click the "Roll Back Commuter" button, and follow the instructions. If the button is greyed out and you cannot click information technology, a previous driver version has not been installed for this device.
[Dorsum to Table of Contents]
Update Webcam Drivers
If rolling back the webcam driver does not solve the problem, the problem might be caused past faulty or incorrect drivers. If the appropriate driver is not installed, the device might not function properly, if at all.
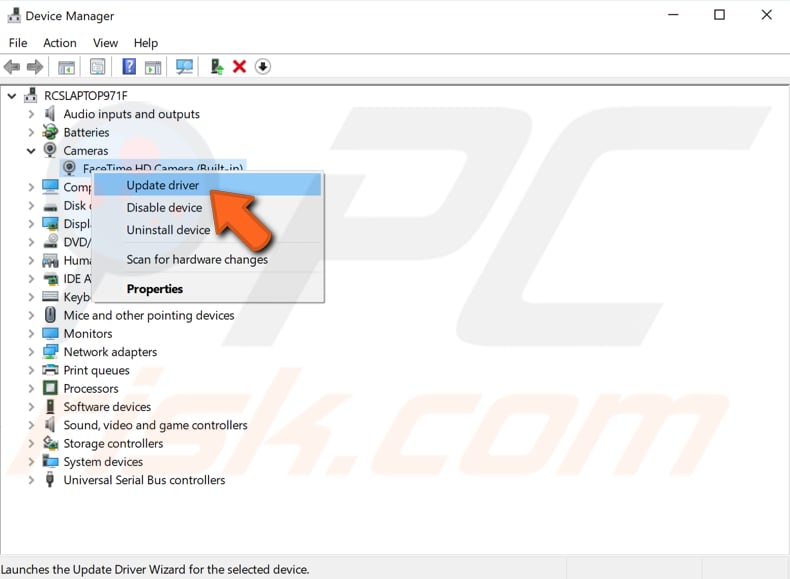
To update the drivers, get to Device Manager and notice the webcam device nether the"Cameras", "Imaging devices" or "Audio, video and game controllers" section and right-click it, and select "Update driver" from the contextual menu.
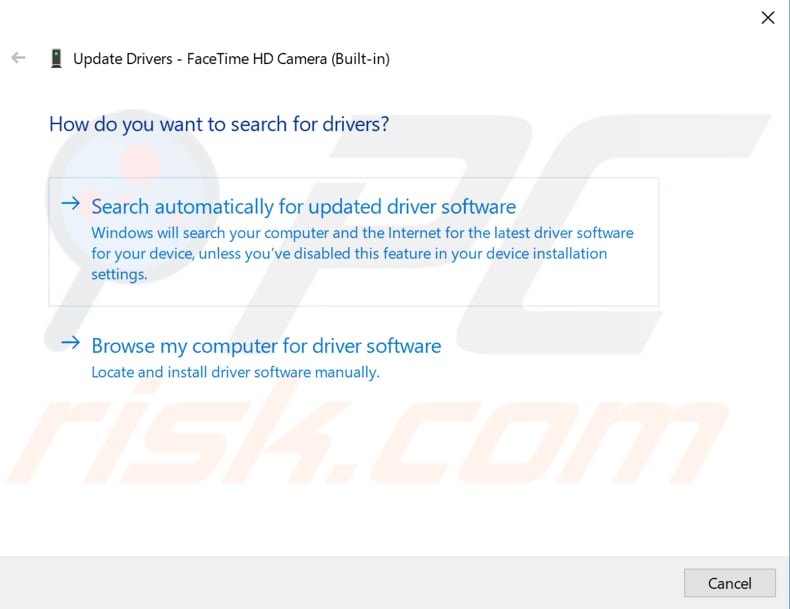
You will be asked if yous want to search for updated driver software automatically or to scan the computer for driver software. If y'all select the first pick, Windows volition search the computer and the Internet for the latest commuter software for your device.
If you select the 2d option, you lot must locate and install the drivers manually. Using this option requires having a previously downloaded commuter on your reckoner or a USB wink bulldoze.
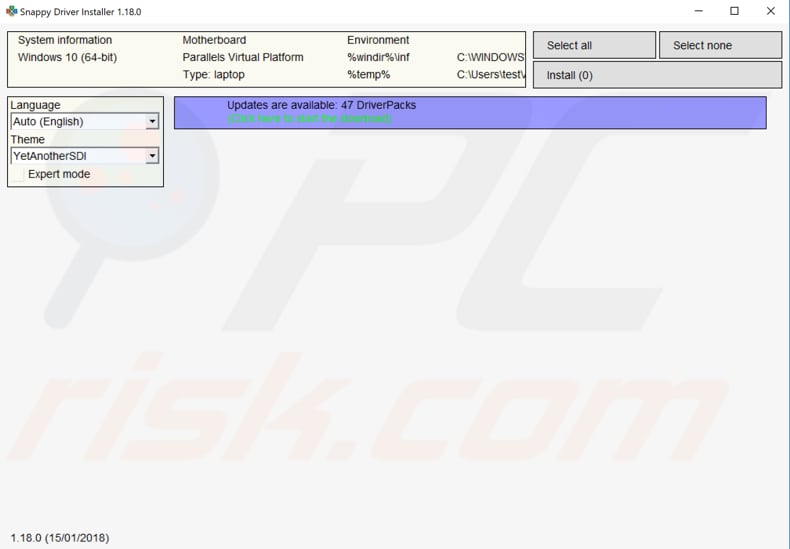
Another way to update or install new drivers for devices is by using third-party software such as Snappy Commuter Installer. You will need a computer with a working Net connection to download information technology. Snappy Driver Installer (SDI) is a powerful costless driver updater tool for Windows that can shop its entire collection of drivers offline. You tin download it from here.
[Back to Table of Contents]
Reinstall Webcam Drivers
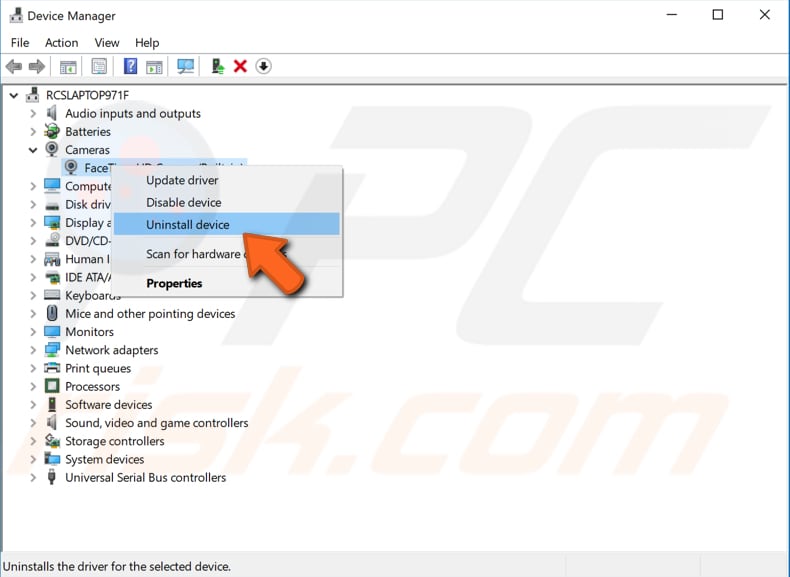
If rolling back and updating webcam drivers does not solve the problem, try uninstalling and so reinstalling them. To do this, open Device Manager, discover the webcam device nether the"Cameras", "Imaging devices" or "Sound, video and game controllers" section and right-click information technology, and select "Uninstall device" from the contextual menu.
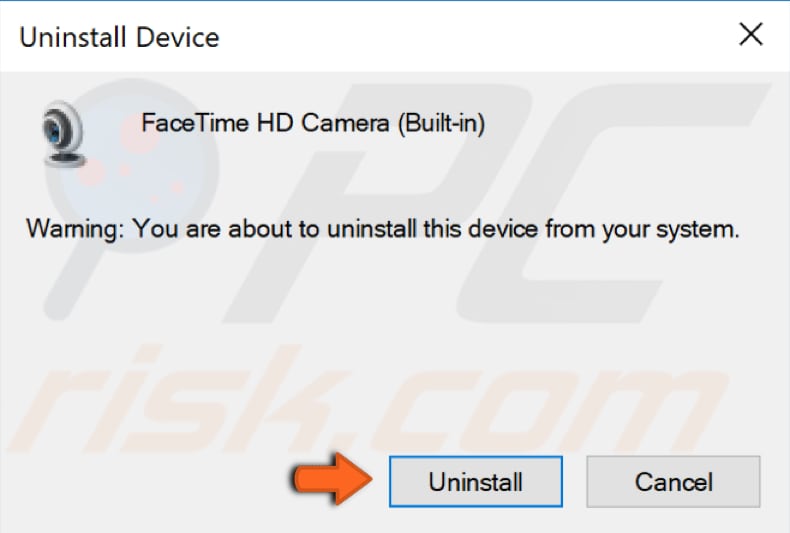
Y'all will receive a warning stating that y'all are about to uninstall this device from your organisation. Mark the "Delete the commuter software for this device" checkbox (if at that place is ane) and click "Uninstall".
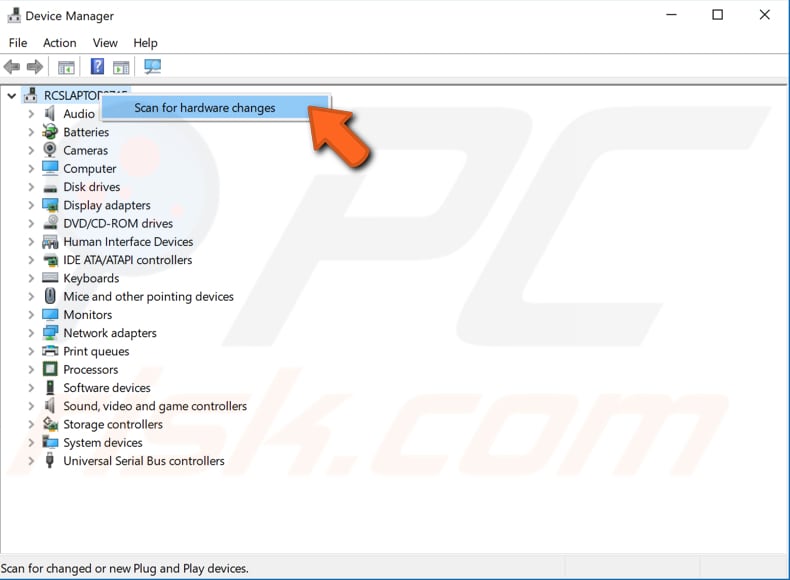
Then, restart the figurer. Windows should automatically install the missing webcam drivers. If it does not, go to Device Manager and right-click the calculator name, select "Scan for hardware changes". See if this solves the webcam problem.
[Back to Tabular array of Contents]
Turn On Your Webcam Using Function Keys
A part cardinal is a primal on a estimator or last keyboard that tin be programmed to cause an operating organization command interpreter or awarding program to perform specific actions. These function keys are those from F1 to F12 on the keyboard. Some F1-F12 keys include additional functionality when used in combination with the Fn key, which is ordinarily located near Ctrl.
Some users take reported that using an Fn + F10 keyboard shortcut solved the problem. In these cases, the cameras were simply disabled - the keyboard shortcut was used to re-enable them. This solution works but on item laptops. Try other Fn + F(any number) keyboard shortcuts to see if any turn on the webcam.
Nosotros hope that these solutions solve your webcam problems. If you know of an alternative solution, delight share information technology with us by leaving a comment in the department below.
[Back to Top]
About the author:

Rimvydas is a researcher with over four years of experience in the cybersecurity manufacture. He attended Kaunas University of Technology and graduated with a Primary's degree in Translation and Localization of Technical texts in 2017. His interests in computers and technology led him to become a versatile author in the IT industry. At PCrisk, he'southward responsible for writing in-depth how-to articles for Microsoft Windows. Contact Rimvydas Iliavicius.
Our guides are free. However, if you want to back up the states you can send us a donation.
Source: https://blog.pcrisk.com/windows/12513-how-to-fix-integrated-webcam
Posted by: hillsomprood.blogspot.com
0 Response to "How To Change The Configuration Of An Integrated Camera Laptop"
Post a Comment